NSX-T Data Center - Attaching a DHCP Relay service to a NSX-T Logical Router Service Interface or Centralized Service Port (CSP)
You can use DHCP (Dynamic Host Configuration Protocol) to dynamically assign IP addresses and other network configuration to our devices.
In NSX-T Data Center you have two (2) flavours that you can use:
- DHCP Server - The DHCP Service and the configurations are managed and run within and by NSX-T managed component
- DHCP Relay - The DHCP Service and the configuration run outside of the NSX-T managed components, for example in a virtual machine, and NSX-T only relays the DHCP Requests to our DHCP server
The NSX-T documentation document the setup of both pretty well:
- Using the Simplified UI
- NSX-T 2.5 - IP Address Management (IPAM)
- NSX-T 3.0 - IP Address Management (IPAM)
- Using the Advanced Network&Security UI
- NSX-T 2.5 - Advanced DHCP
- NSX-T 3.0 - DHCP in Manager Mode
Ooopss… we have an edge case in hands
The NSX-T documentation well how to configure the Edge builtin DHCP Server functionality and how to configure a DHCP Relay server for a T0 or T1 gateway.
What if we want to add a DHCP Relay Service to a Service Interface of a T0 or T1 router?
Documentation do not cover this use case and you do not have a way of doing it through the Simplified UI, neither through Advanced&Security UI.
Which will leave us with the option to explore the RestAPI option.
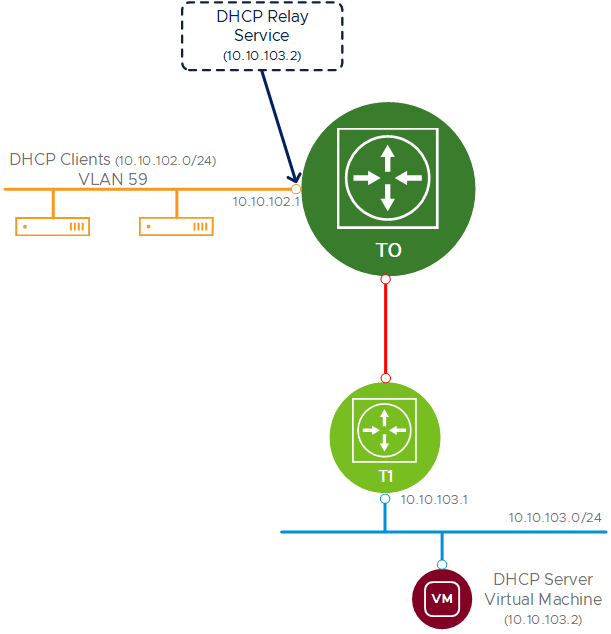
Use Case
- DHCP Clients are connected to VLAN 59
- VLAN 59 is connected to a T0 - Service Interface
- T0 - Service Interface is configured as VLAN 59 gateway
- DHCP Relay service will be setup in T0 - Service Interface to relay DHCP Requests to DHCP Server
- T0s and T1s are in different edge clusters (this is a design preference, we can use a single edge cluster/edge)
- Route redistribution is enabled between T0 and T1 (static routing can be used)
- DHCP Server is a virtual machine running in an overlay segment connected to T1 - Downlink
- Note: our use case setup the DHCP Relay in the T0 - Service Interface, but we could use a T1 - Service Interface also
Solution
The configuration can be done using NSX-T RESTApis, but we will be using the NSX-T UI when possible.
Setting up the basics using the Simplified UI
Creating our DHCP Client segment and T0 - Service Interface
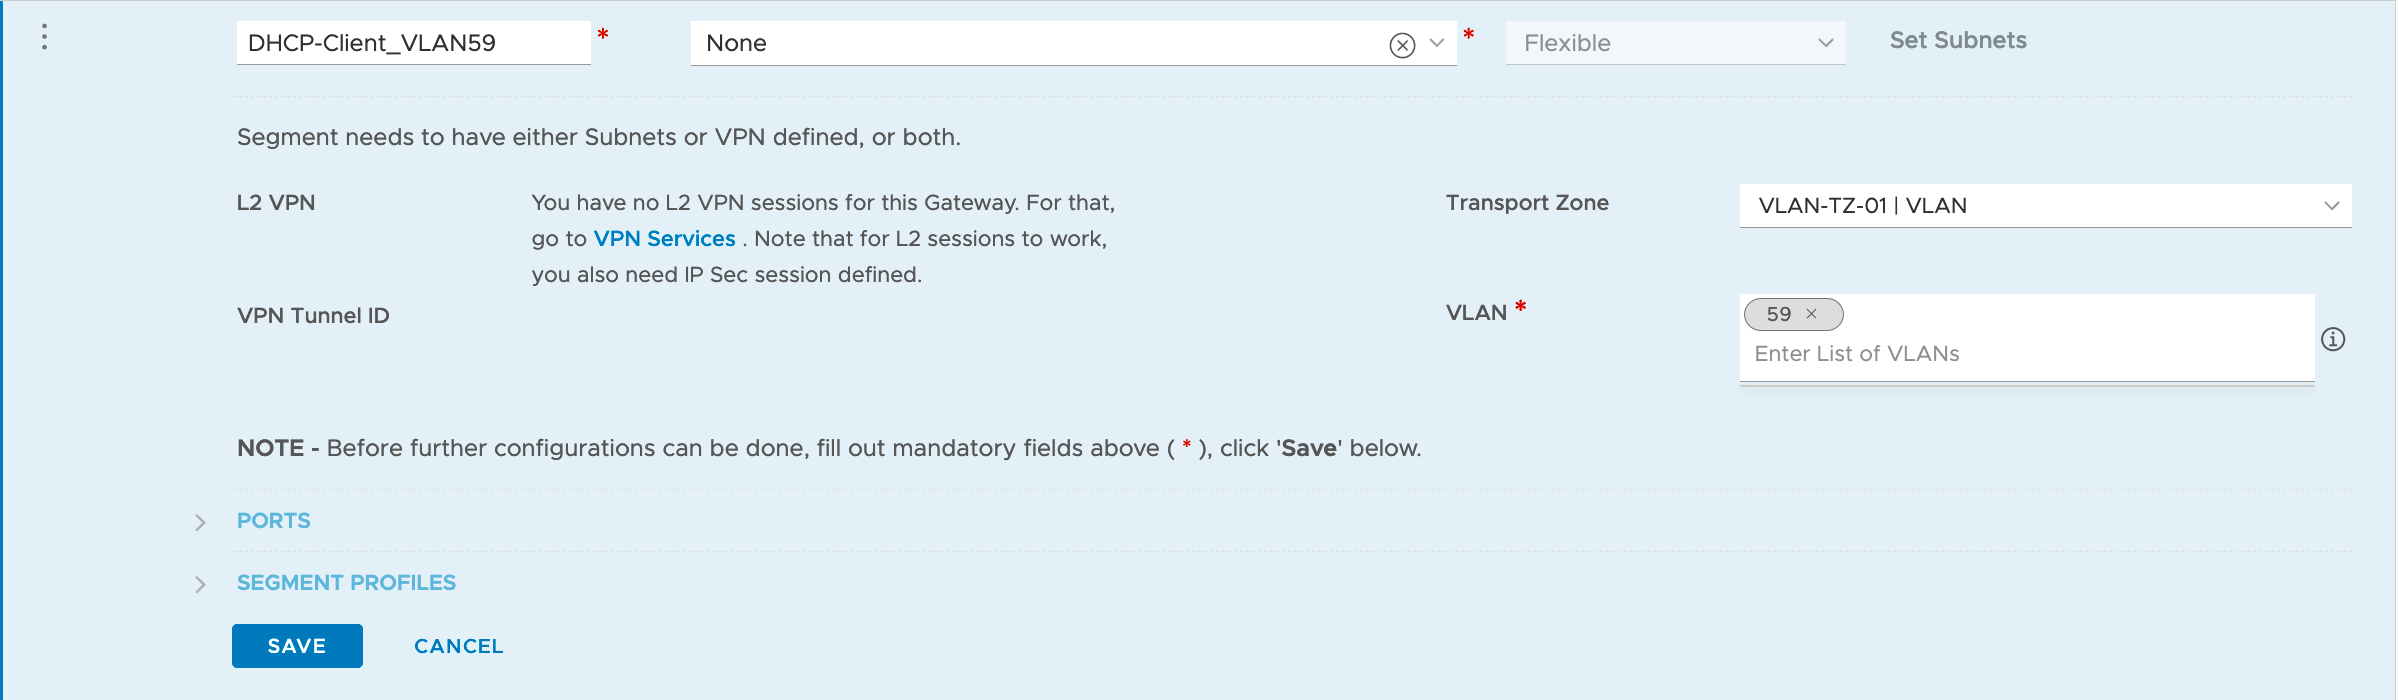
Create our DHCP Client segment (NVDS VLAN backed)
- Networking -> Segments -> Add Segment
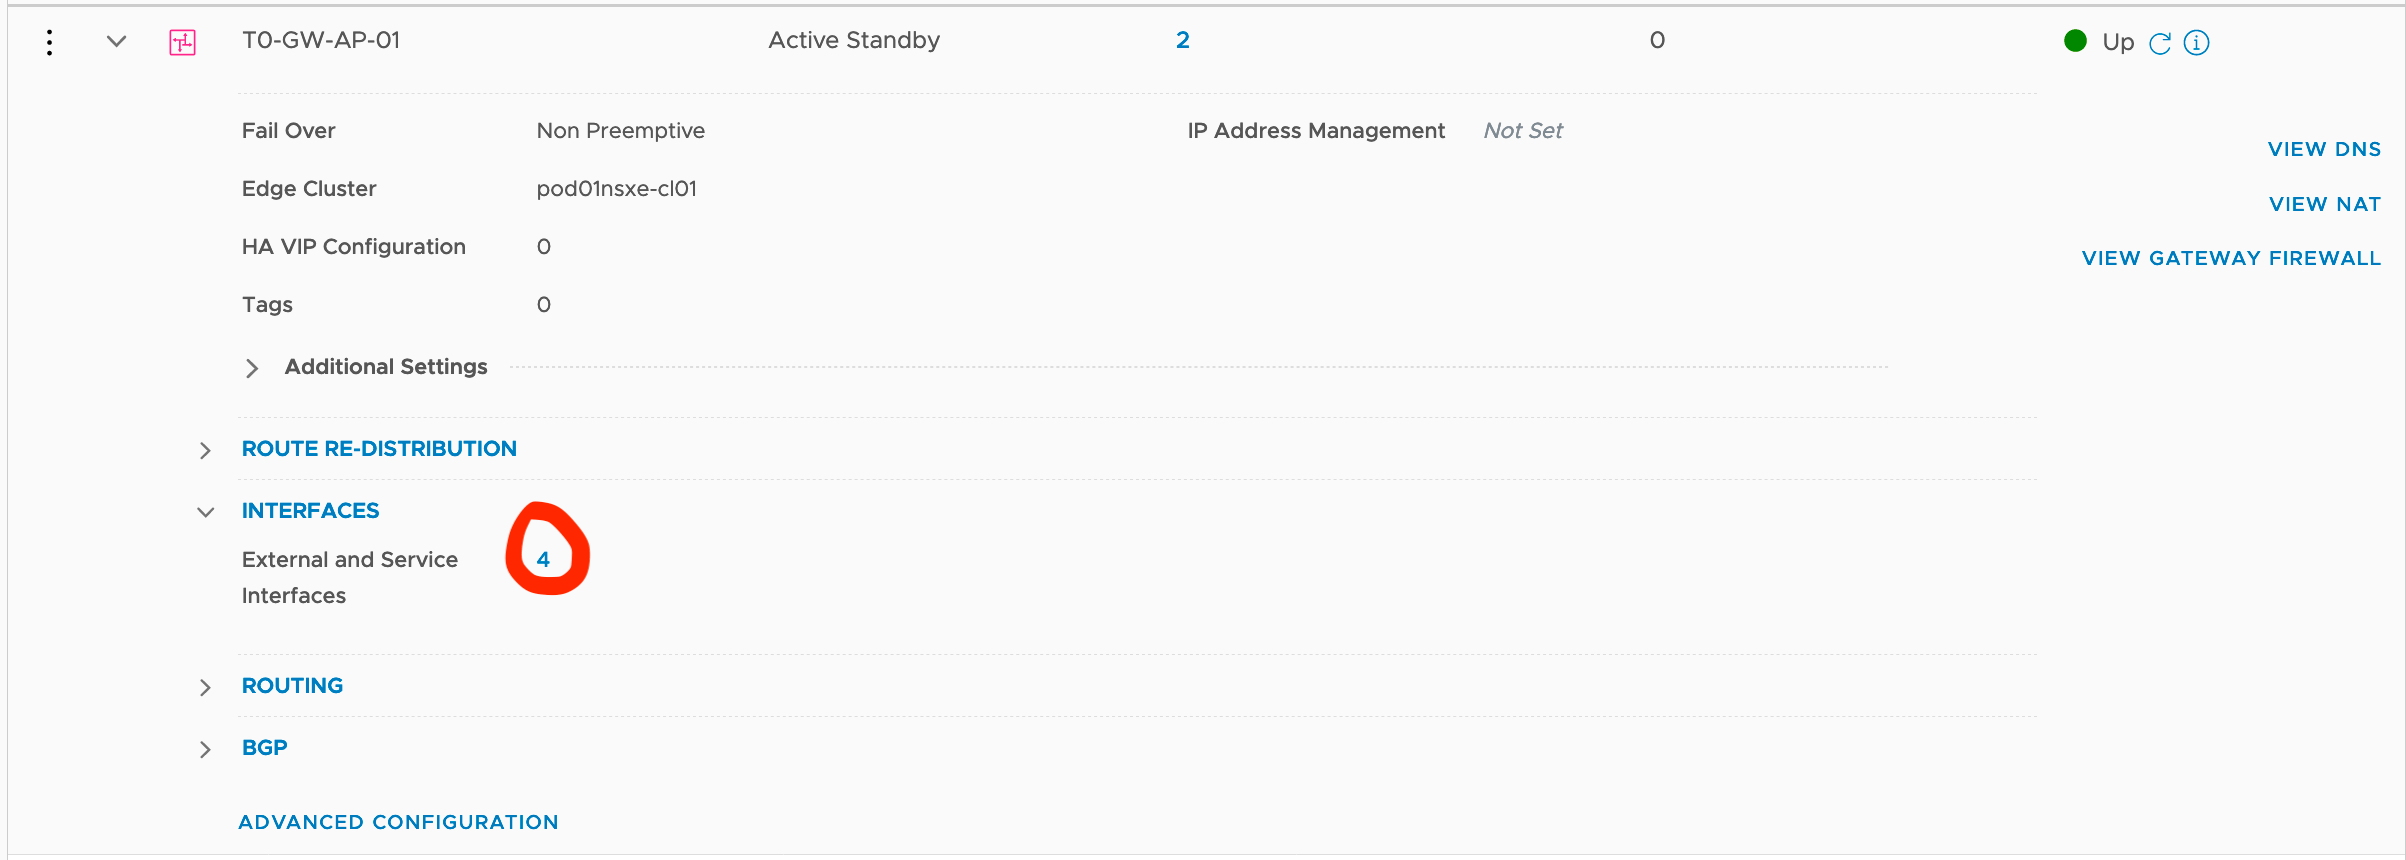
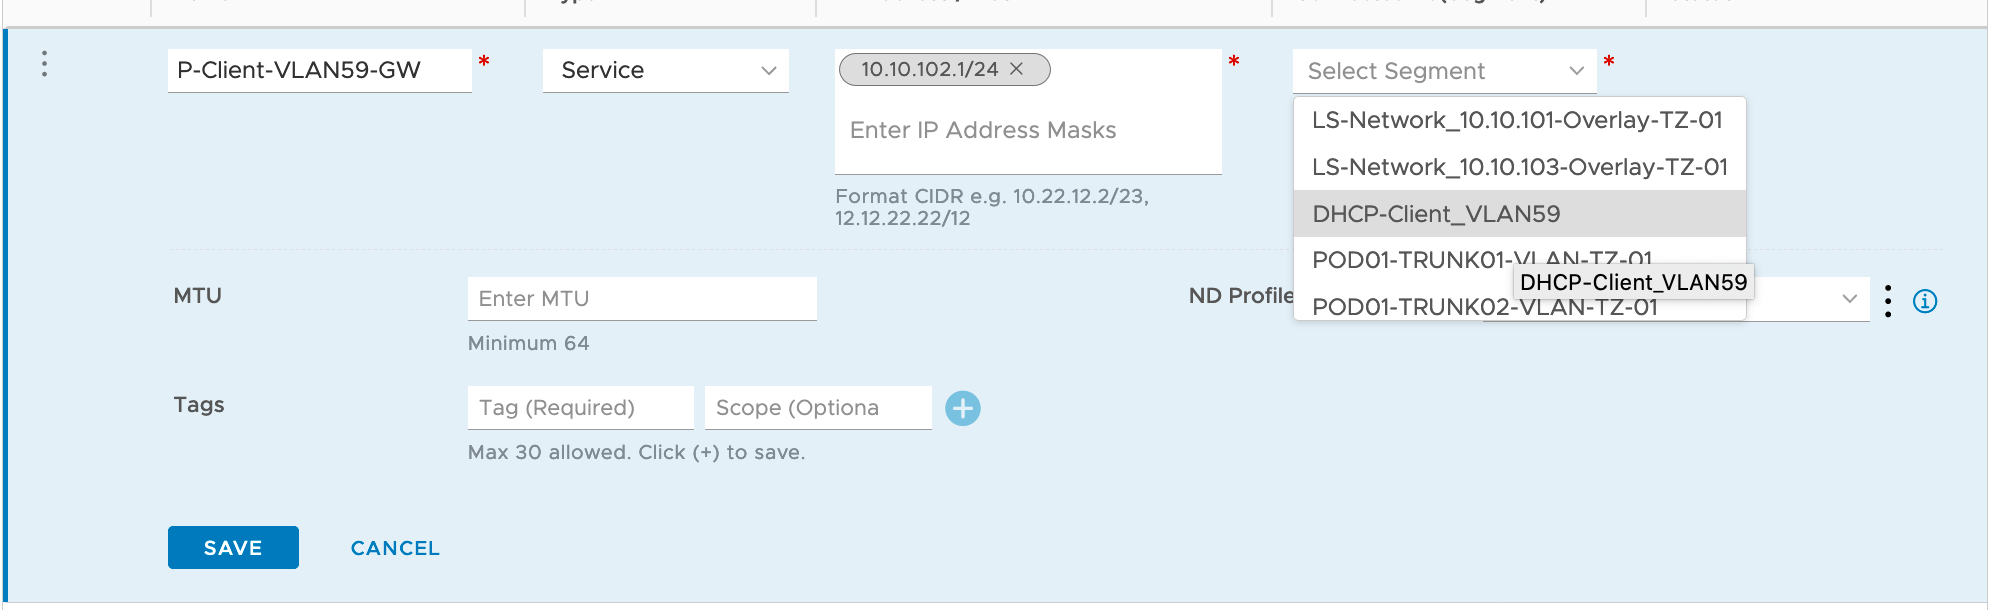
Create the T0 - Service Interface interface
-
Networking -> Tier-0 Gateway -> Edit the T0 Gateway -> Edit Interfaces (Click in the Interface count) -> Add Interface

Creating DHCP Server segment and connecting it to our desired T1 Gateway
Create our overlay segment for the DHCP Server
-
Networking -> Segments -> Add Segment
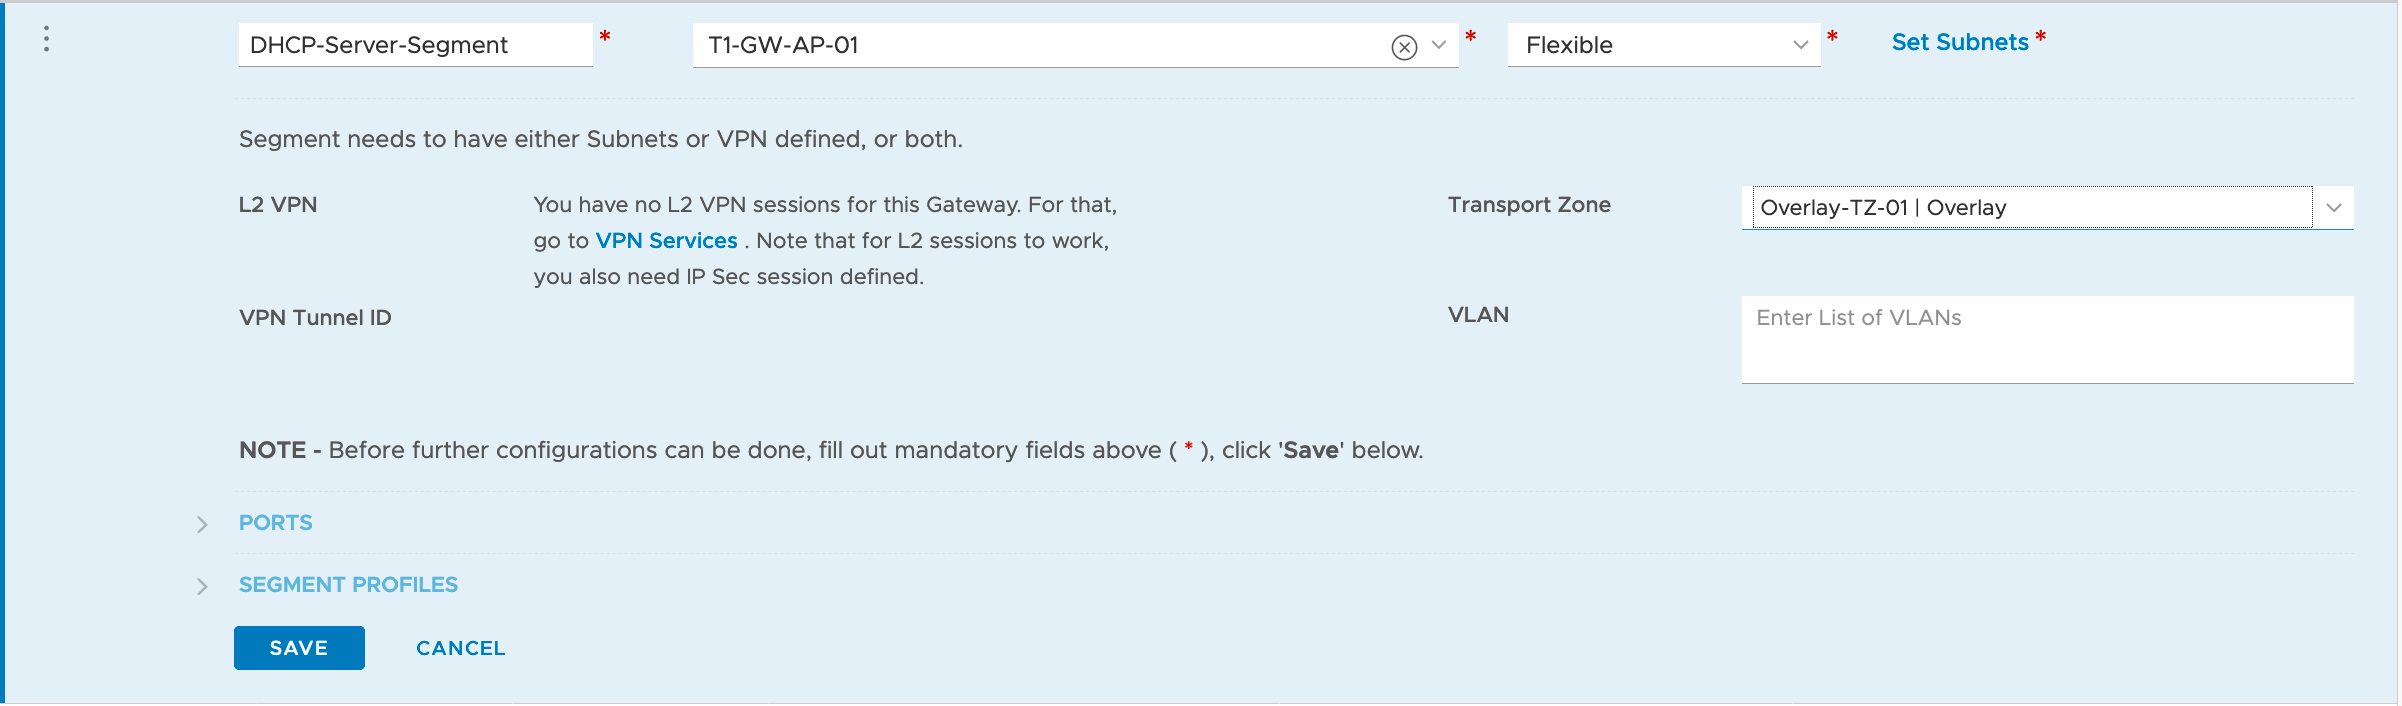
-
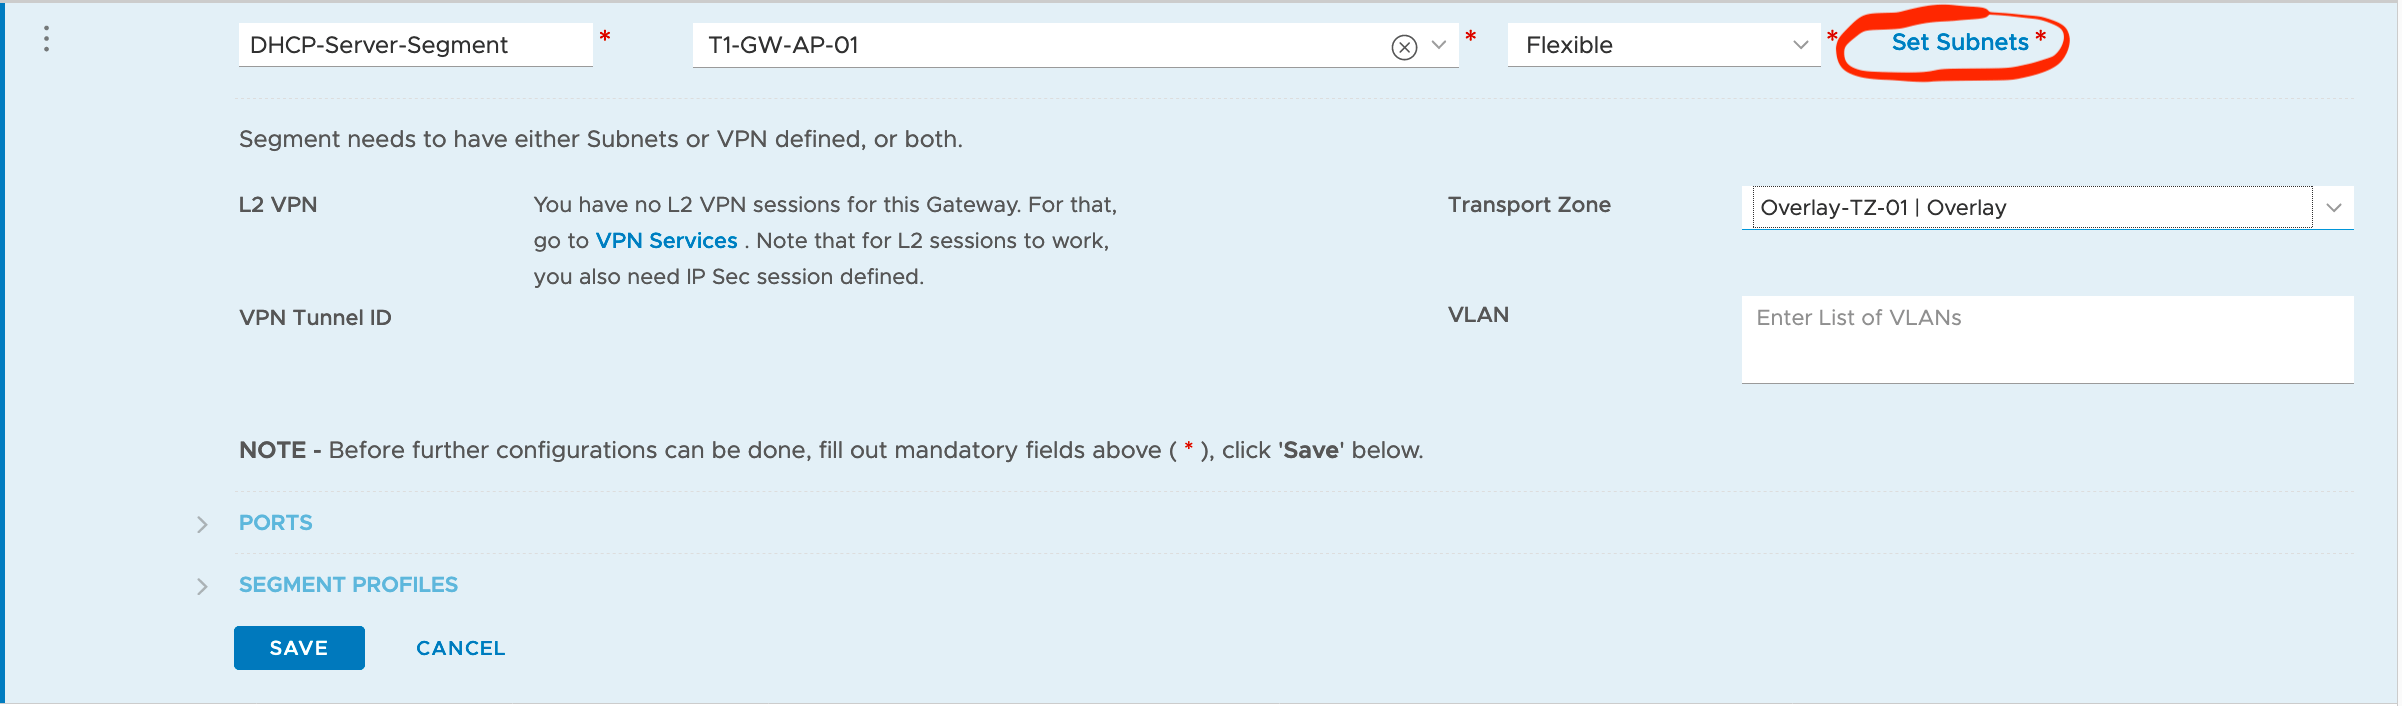
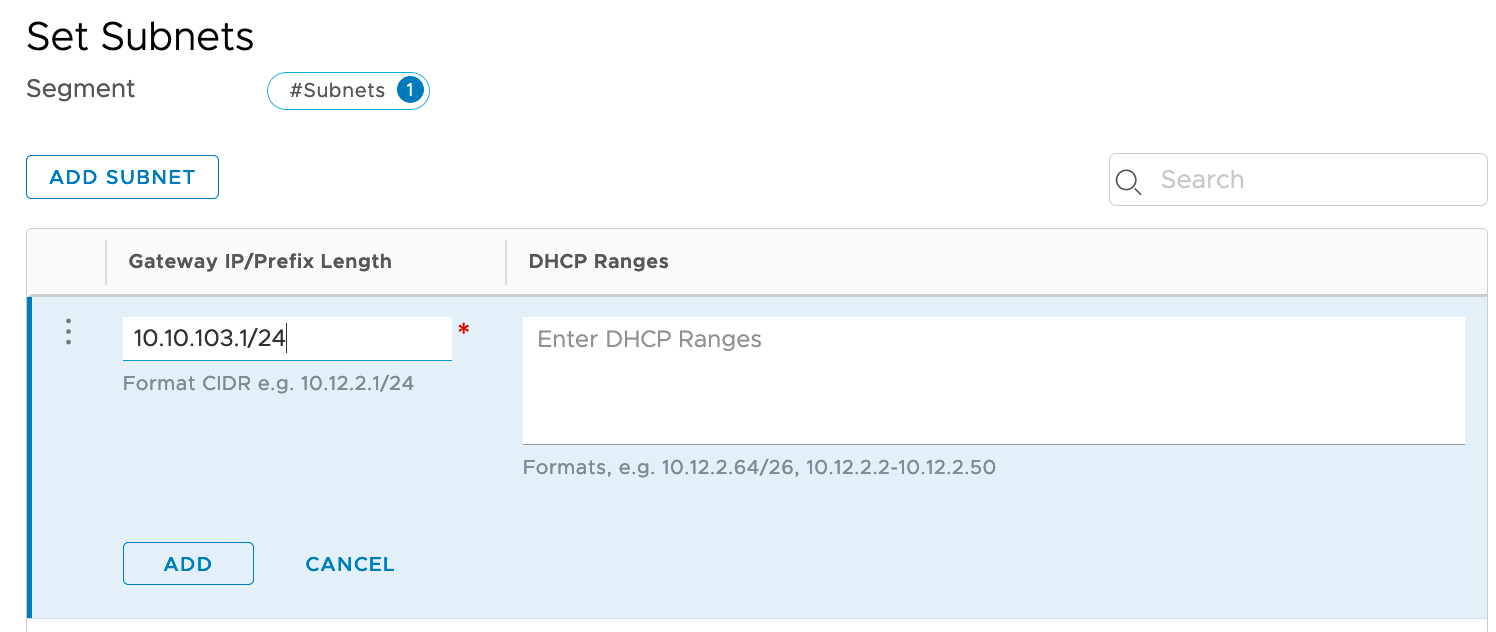
Setting up segment subnet (-> Set Subnets)
-
Creating our DHCP Relay service using Advanced Network&Security UI
In NSX-T 2.5 you have two (2) options to setup a DHCP Relay service using the UI - Simplified UI or Advanced&Security UI.
This changes in NSX-T 3.0 but the post is covering the UI setup for NSX-T 2.5 only, since at the moment my Homelab is locked in that version, potentially a future update of the post will happen once I update the Homelab to NSX-T 3.0.
Since we will need to leverage the NSX-T Management API instead of the new NSX-T Policy API, the DHCP Relay configuration will need to be done through the Advanced Network&Security UI.
Setting up our DHCP Relay Profile and DHCP Relay Service
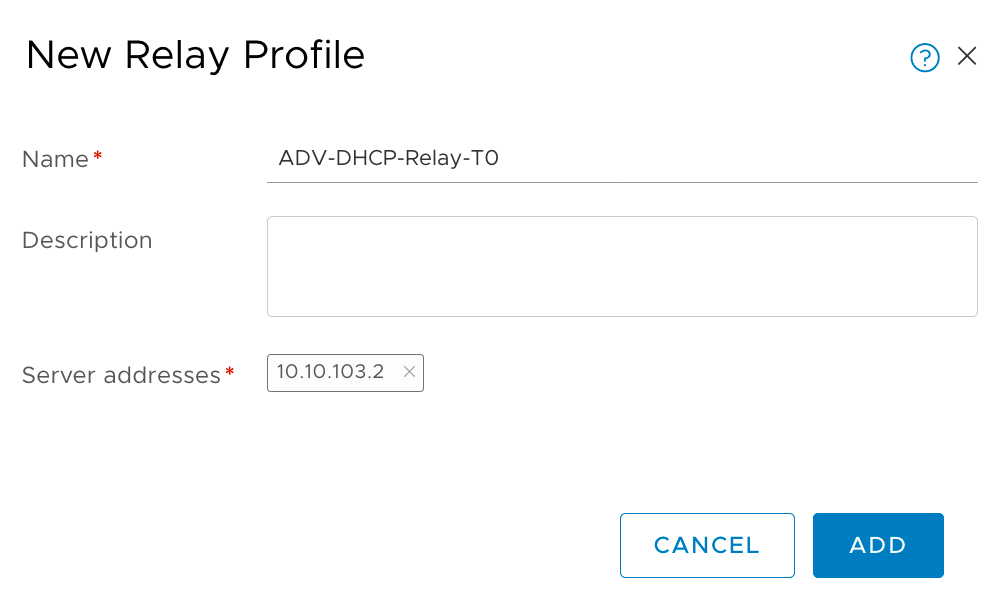
First step creating a DHCP Relay Profile
-
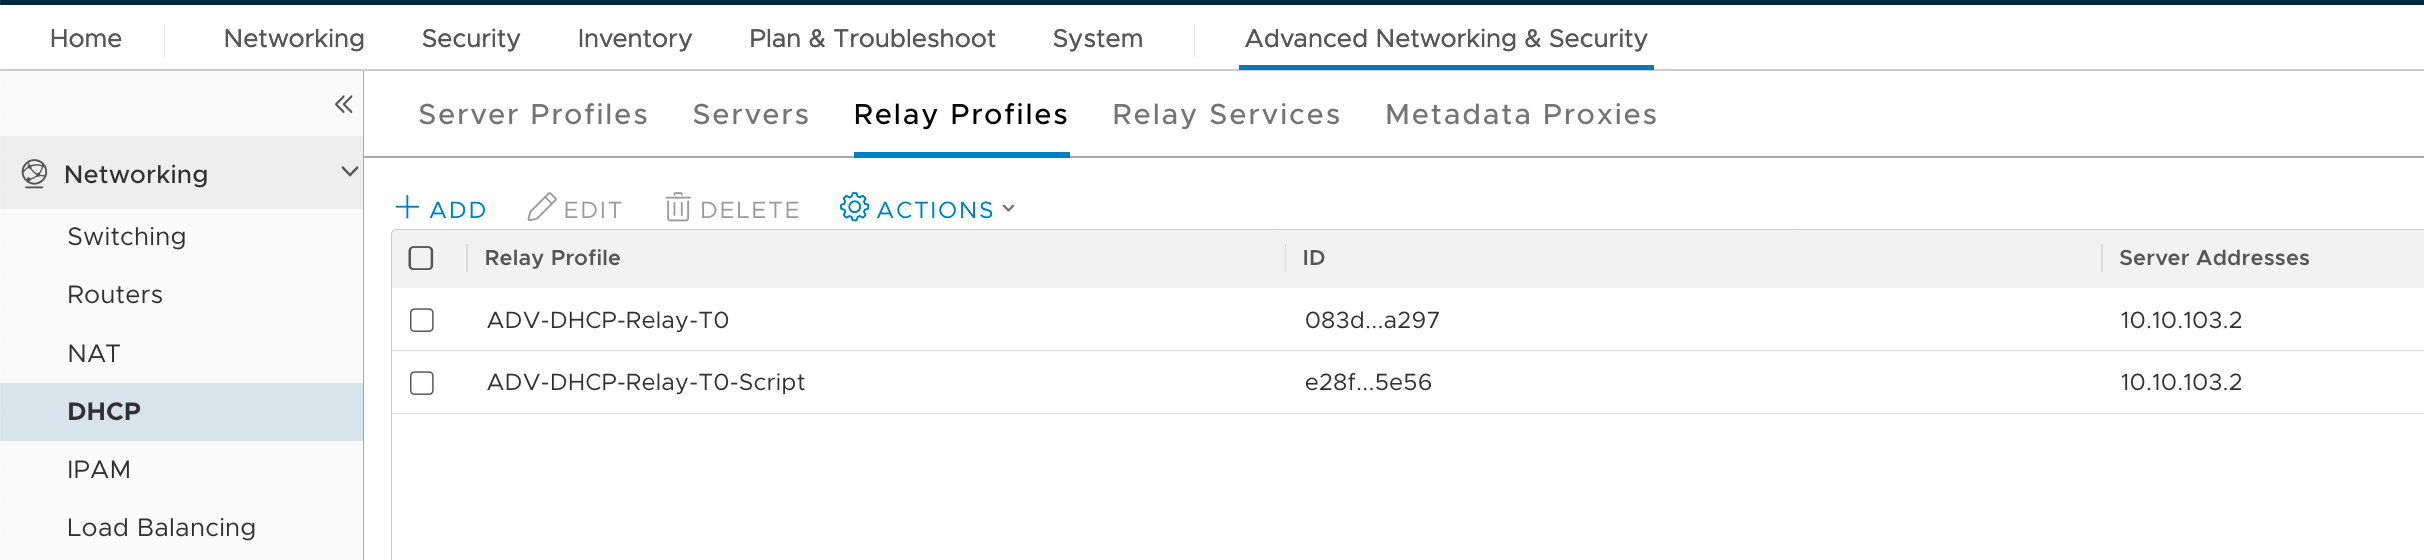
Advanced Network&Security -> DHCP -> Relay Profiles
-
Create the DHCP Relay Profile to use our DHCP Server (Advanced Network&Security -> DHCP -> Relay Profiles -> Add)
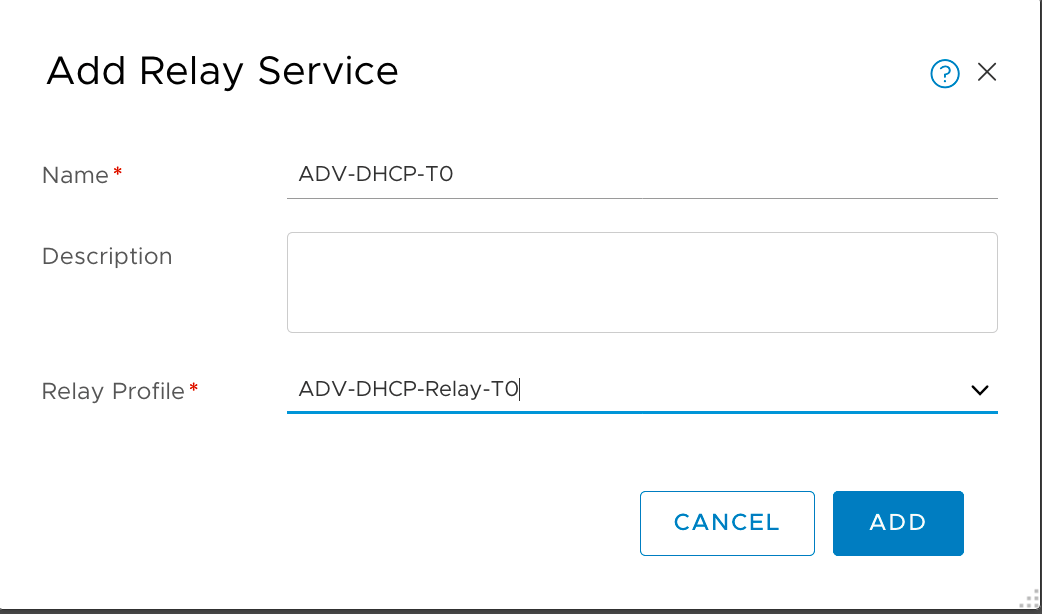
Create the DHCP Relay service
-
Advanced Network&Security -> DHCP -> Relay Services

-
Create the DHCP Relay Service to use our DHCP Server Profile that we created previously (Advanced Network&Security -> DHCP -> Relay Services -> Add)
Gather the information needed using NSX-T Management API
I will be using Postman since it is easier do describe the process, but there will be a Powershell script in the end that will achieve the same result.
-
List DHCP Relay Services
GET https://<NSX-T Manager>/api/v1/dhcp/relaysNSX-T 2.5 API Documentation - GET /api/v1/dhcp/relays
{ "results": [ { "dhcp_relay_profile_id": "083d2a17-67ea-417b-96cd-b20f3f80a297", "resource_type": "DhcpRelayService", "id": "7f541ee6-5c3c-4cfd-9d1b-0acb8f2746f0", "display_name": "ADV-DHCP-T0", "_create_user": "admin", "_create_time": 1588777188827, "_last_modified_user": "admin", "_last_modified_time": 1588777188827, "_system_owned": false, "_protection": "NOT_PROTECTED", "_revision": 0 } ], "result_count": 1 } -
List Logical Router Ports
GET https://<NSX-T Manager>/api/v1/logical-router-ports/NSX-T 2.5 API Documentation - GET /api/v1/logical-router-ports/
{
  "results": [
    {
      "linked_logical_switch_port_id": {
        "target_id": "7499425d-24f7-4958-b9a7-4a1f9e82415b"
      },
      "subnets": [
        {
          "ip_addresses": [
            "10.10.102.1"
          ],
          "prefix_length": 24
        }
      ],
      "urpf_mode": "STRICT",
      "enable_netx": false,
      "resource_type": "LogicalRouterCentralizedServicePort",
      "id": "97f9c944-0c46-4a43-9add-36b3588a3a44",
      "display_name": "DHCP-Client-VLAN59-GW",
      "description": "Logical router port for interface /infra/tier-0s/T0-GW-AP-01/locale-services/b4ccdd40-5687-11ea-9fa9-99aa5ce534ea/interfaces/DHCP-Client-VLAN59-GW",
      "tags": [
        {
          "scope": "policyPath",
          "tag": "/infra/tier-0s/T0-GW-AP-01/locale-services/b4ccdd40-5687-11ea-9fa9-99aa5ce534ea/interfaces/DHCP-Client-VLAN59-GW"
        }
      ],
      "logical_router_id": "a8b32d77-a665-4c27-b76d-c41022e180f0",
      "_create_user": "nsx_policy",
      "_create_time": 1592053513339,
      "_last_modified_user": "nsx_policy",
      "_last_modified_time": 1592053513339,
      "_system_owned": false,
      "_protection": "REQUIRE_OVERRIDE",
      "_revision": 0
    },
  <...>
  ],
  "result_count": 11
}
Attaching DHCP Relay service to Service Interface
The configuration will be done by doing a PUT REST API call using the Management API that will attach a new service to an existing Service Interface.
Some information from previous calls will be needed to be able to put together the JSON payload required to do our setup.
-
Retrieve Service Interface current configuration
GET https://<NSX-T Manager>/api/v1/logical-router-ports/<logical-router-port-id>/NSX-T 2.5 API Documentation - GET /api/v1/logical-router-ports/logical-router-port-id
We will use the ID information that we retrieved before and get the Service Interface current configuration, since we will use it as the base of our JSON payload for the configuration call.
<...> "id": "97f9c944-0c46-4a43-9add-36b3588a3a44", "display_name": "DHCP-Client-VLAN59-GW", <...>-
GET https://<NSX-T Manager>/api/v1/logical-router-ports/97f9c944-0c46-4a43-9add-36b3588a3a44/{ "linked_logical_switch_port_id": { "target_id": "7499425d-24f7-4958-b9a7-4a1f9e82415b" }, "subnets": [ { "ip_addresses": [ "10.10.102.1" ], "prefix_length": 24 } ], "urpf_mode": "STRICT", "enable_netx": false, "resource_type": "LogicalRouterCentralizedServicePort", "id": "97f9c944-0c46-4a43-9add-36b3588a3a44", "display_name": "DHCP-Client-VLAN59-GW", "description": "Logical router port for interface /infra/tier-0s/T0-GW-AP-01/locale-services/b4ccdd40-5687-11ea-9fa9-99aa5ce534ea/interfaces/DHCP-Client-VLAN59-GW", "tags": [ { "scope": "policyPath", "tag": "/infra/tier-0s/T0-GW-AP-01/locale-services/b4ccdd40-5687-11ea-9fa9-99aa5ce534ea/interfaces/DHCP-Client-VLAN59-GW" } ], "logical_router_id": "a8b32d77-a665-4c27-b76d-c41022e180f0", "_create_user": "nsx_policy", "_create_time": 1592053513339, "_last_modified_user": "nsx_policy", "_last_modified_time": 1592053513339, "_system_owned": false, "_protection": "REQUIRE_OVERRIDE", "_revision": 0 }
-
-
Build our JSON payload to attach our DHCP Relay service to the Service Interface
-
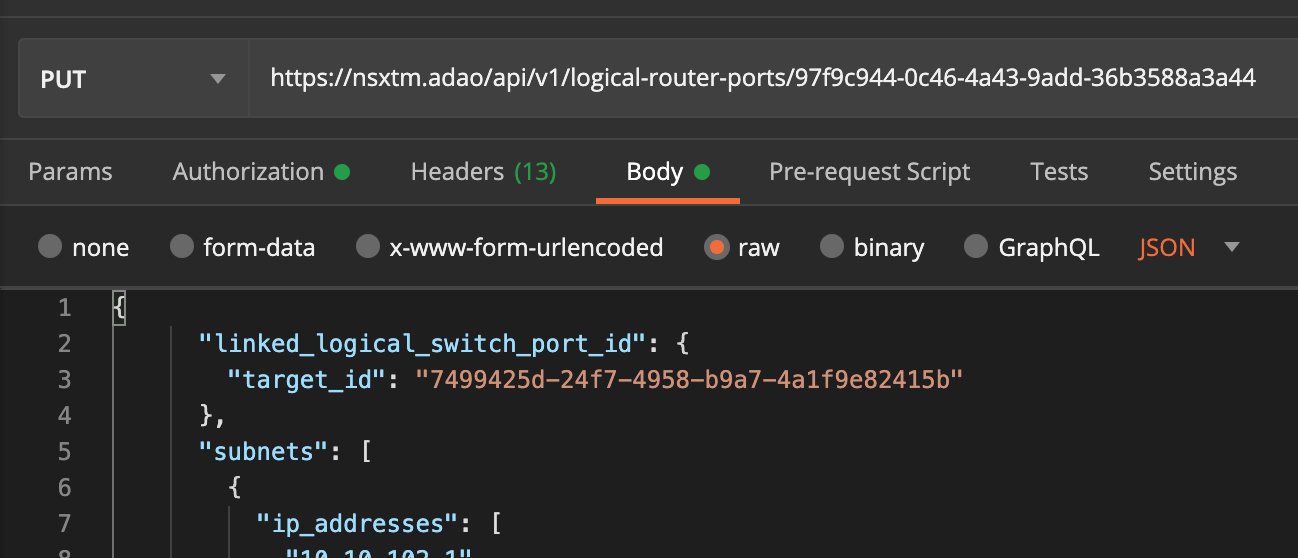
Our configuration call will be
PUT https://<NSX-T Manager>/api/v1/logical-router-ports/<logical-router-port-id>/NSX-T 2.5 API Documentation - PUT /api/v1/logical-router-ports/logical-router-port-id/
-
Our JSON payload will be based in the current Service Interface configuration that we just retrieved, plus an additional property called service_bindings that will can be one or more Service Binding
{ "service_id": { "target_display_name": "Display Name of NSX Resource", "is_valid": true, (false if element been deleted) "target_type": "Type of NSX Resource", "target_id": "ID of NSX Resource" } } -
Our Service Binding element will have the information of our DHCP Relay Service
"service_bindings": [ { "service_id": { "target_display_name": "ADV-DHCP-T0", "is_valid": true, "target_type": "DhcpRelayService", "target_id": "7f541ee6-5c3c-4cfd-9d1b-0acb8f2746f0" } } ] -
Our final JSON payload will be then
{ "linked_logical_switch_port_id": { "target_id": "7499425d-24f7-4958-b9a7-4a1f9e82415b" }, "subnets": [ { "ip_addresses": [ "10.10.102.1" ], "prefix_length": 24 } ], "urpf_mode": "STRICT", "enable_netx": false, "resource_type": "LogicalRouterCentralizedServicePort", "id": "97f9c944-0c46-4a43-9add-36b3588a3a44", "display_name": "DHCP-Client-VLAN59-GW", "description": "Logical router port for interface /infra/tier-0s/T0-GW-AP-01/locale-services/b4ccdd40-5687-11ea-9fa9-99aa5ce534ea/interfaces/DHCP-Client-VLAN59-GW", "tags": [ { "scope": "policyPath", "tag": "/infra/tier-0s/T0-GW-AP-01/locale-services/b4ccdd40-5687-11ea-9fa9-99aa5ce534ea/interfaces/DHCP-Client-VLAN59-GW" } ], "service_bindings": [ { "service_id": { "target_display_name": "ADV-DHCP-T0", "is_valid": true, "target_type": "DhcpRelayService", "target_id": "7f541ee6-5c3c-4cfd-9d1b-0acb8f2746f0" } } ], "logical_router_id": "a8b32d77-a665-4c27-b76d-c41022e180f0", "_create_user": "nsx_policy", "_create_time": 1592053513339, "_last_modified_user": "nsx_policy", "_last_modified_time": 1592053513339, "_system_owned": false, "_protection": "REQUIRE_OVERRIDE", "_revision": 0 } -
One last detail before we apply our new configuration
In the Service Interface configuration schema, there is a property named _protection. This property indicates the protection status of the resource. That property can have one of the following values
- PROTECTED - the client who retrieved the entity is not allowed to modify it
- NOT_PROTECTED - the client who retrieved the entity is allowed to modify it
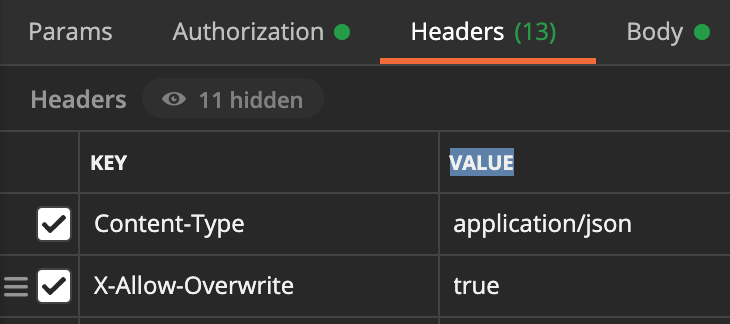
- REQUIRE_OVERRIDE - the client who retrieved the entity is a super user and can modify it, but only when providing the request header X-Allow-Overwrite=true
- UNKNOWN - the _protection field could not be determined for this entity
In our case we have a REQUIRE_OVERRIDE value, which means that we will need to provide the extra request header - X-Allow-Overwrite=true - in our PUT call to be able to modify the current configuration
If we do not add this extra request header, NSX-T API will reply with
{
  "httpStatus": "BAD_REQUEST",
  "error_code": 289,
  "module_name": "common-services",
  "error_message": "Principal 'admin' with role '[enterprise_admin]' attempts to delete or modify an object of type LRPort it doesn't own. (createUser=nsx_policy, allowOverwrite=null)"
}
-
-
Now we are ready to attach our DHCP Relay service to the Service Interface
Our request will be
PUT https://nsxtm/api/v1/logical-router-ports/97f9c944-0c46-4a43-9add-36b3588a3a44/And the body/payload of the request will be our prepared JSON payload with the DHCP Relay service configuration added.
If all goes well, you will have a HTTP 200 result

And the new Service Interface configuration in the response body, with the service binding added
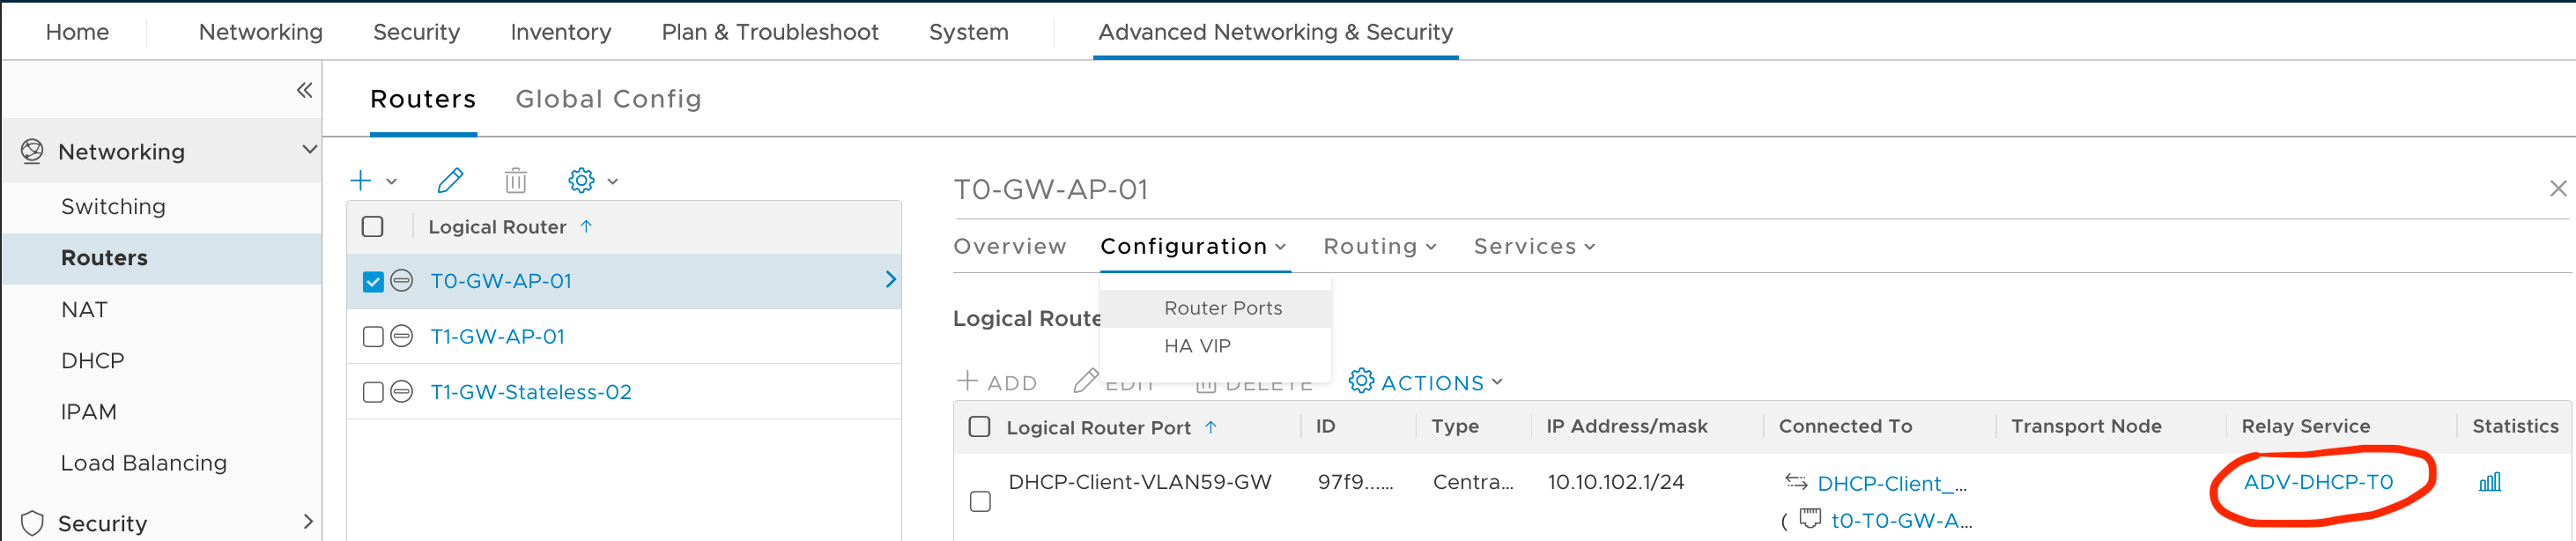
{
  <...>
  "resource_type": "LogicalRouterCentralizedServicePort",
  "id": "97f9c944-0c46-4a43-9add-36b3588a3a44",
  "display_name": "DHCP-Client-VLAN59-GW",
  <...>
  "service_bindings": [
    {
      "service_id": {
        "target_id": "7f541ee6-5c3c-4cfd-9d1b-0acb8f2746f0",
        "target_display_name": "ADV-DHCP-T0",
        "target_type": "DhcpRelayService",
        "is_valid": true
      }
    }
  ],
  <...>
  "_create_user": "nsx_policy",
  "_create_time": 1592053513339,
  "_last_modified_user": "admin",
  "_last_modified_time": 1592088370061,
  "_system_owned": false,
  "_protection": "REQUIRE_OVERRIDE",
  "_revision": 3
}
We can also double check the configuration using the Advanced Network&Security UI
Advanced Network&Security -> Routers -> Select targeted Router -> Configuration -> Router Ports
[
 ](/assets/images/posts/2020/06/nsxt-attach-dhcp-relay-put-3.png
The Result
And the only part missing… Testing it…
We have multiple points in the path between the DHCP Client and DHCP Server to monitor and capture our traffic, but we will just check the server side and if our client acquires a IP.
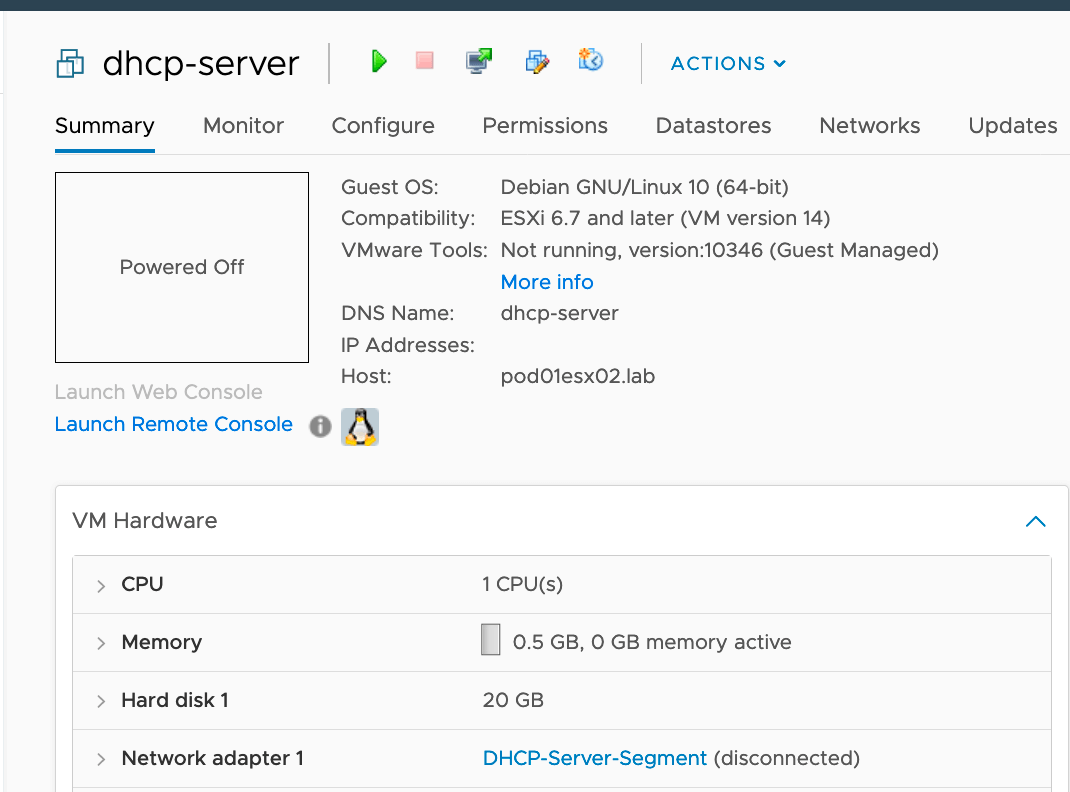
Virtual Machines configuration
-
Client and Server virtual machines
Check DHCP Server
Lets do a packet capture in the listening interface and limit the ports to port 67/UDP and port 68/UDP, since they are the ports involved in the DHCP flow from the server side.
-
Basic capture

Seems that we have some communication between our DHCP Client GW (Service Interface - 10.10.102.1) interface where the DHCP Relay service is attached and our DHCP Server (IP - 10.10.103.2).
-
Checking in more detail the capture to check if the DHCP Operation flow is complete
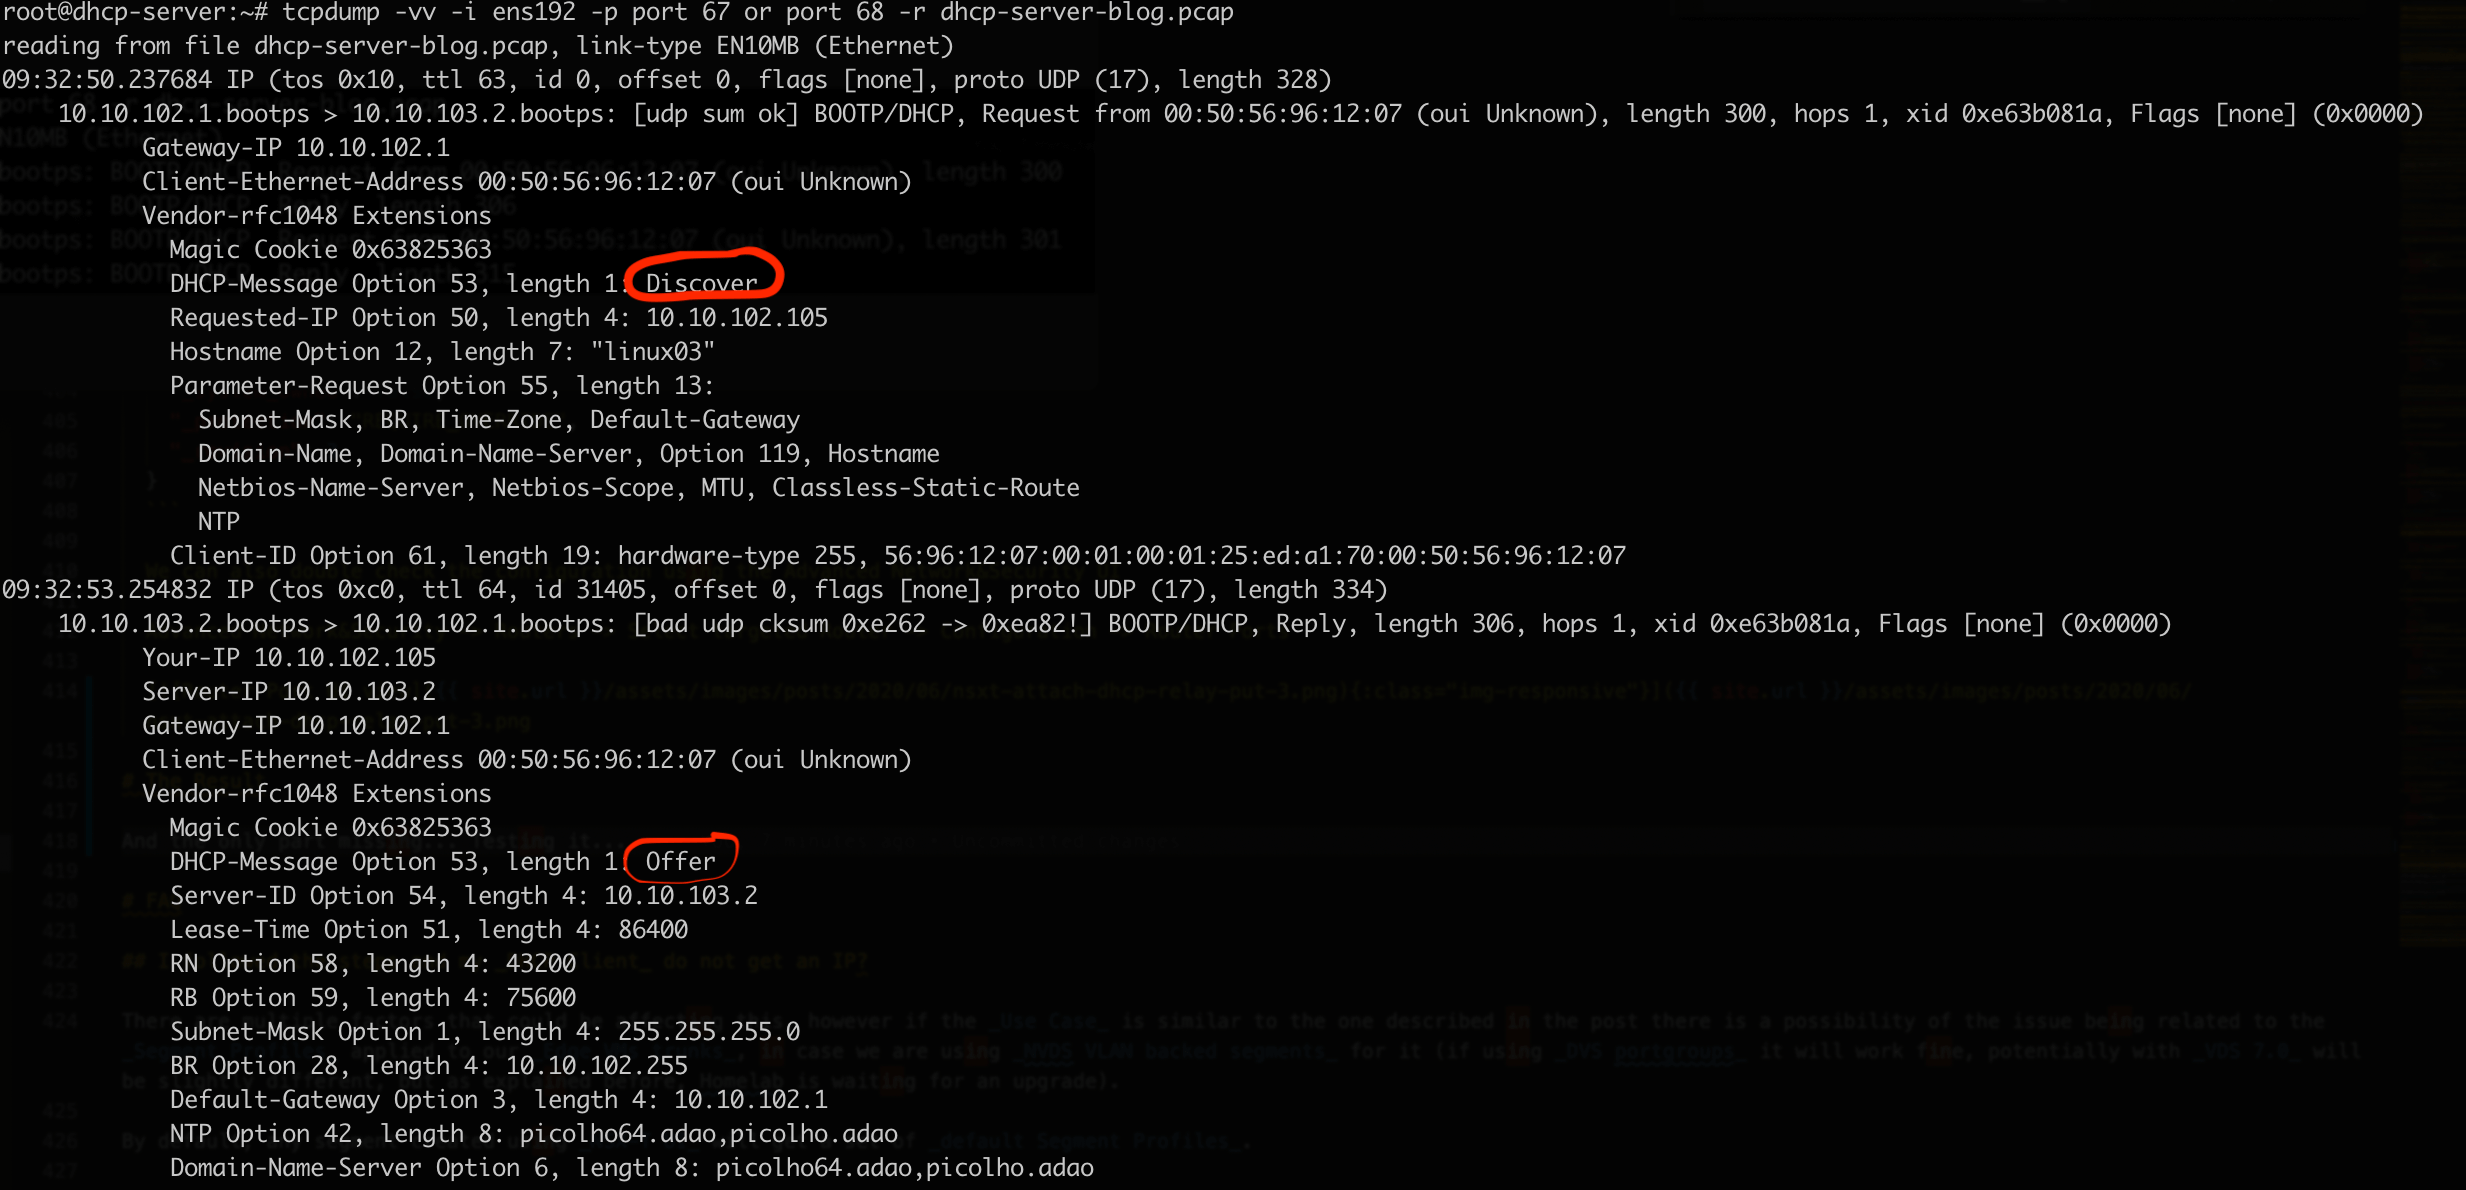
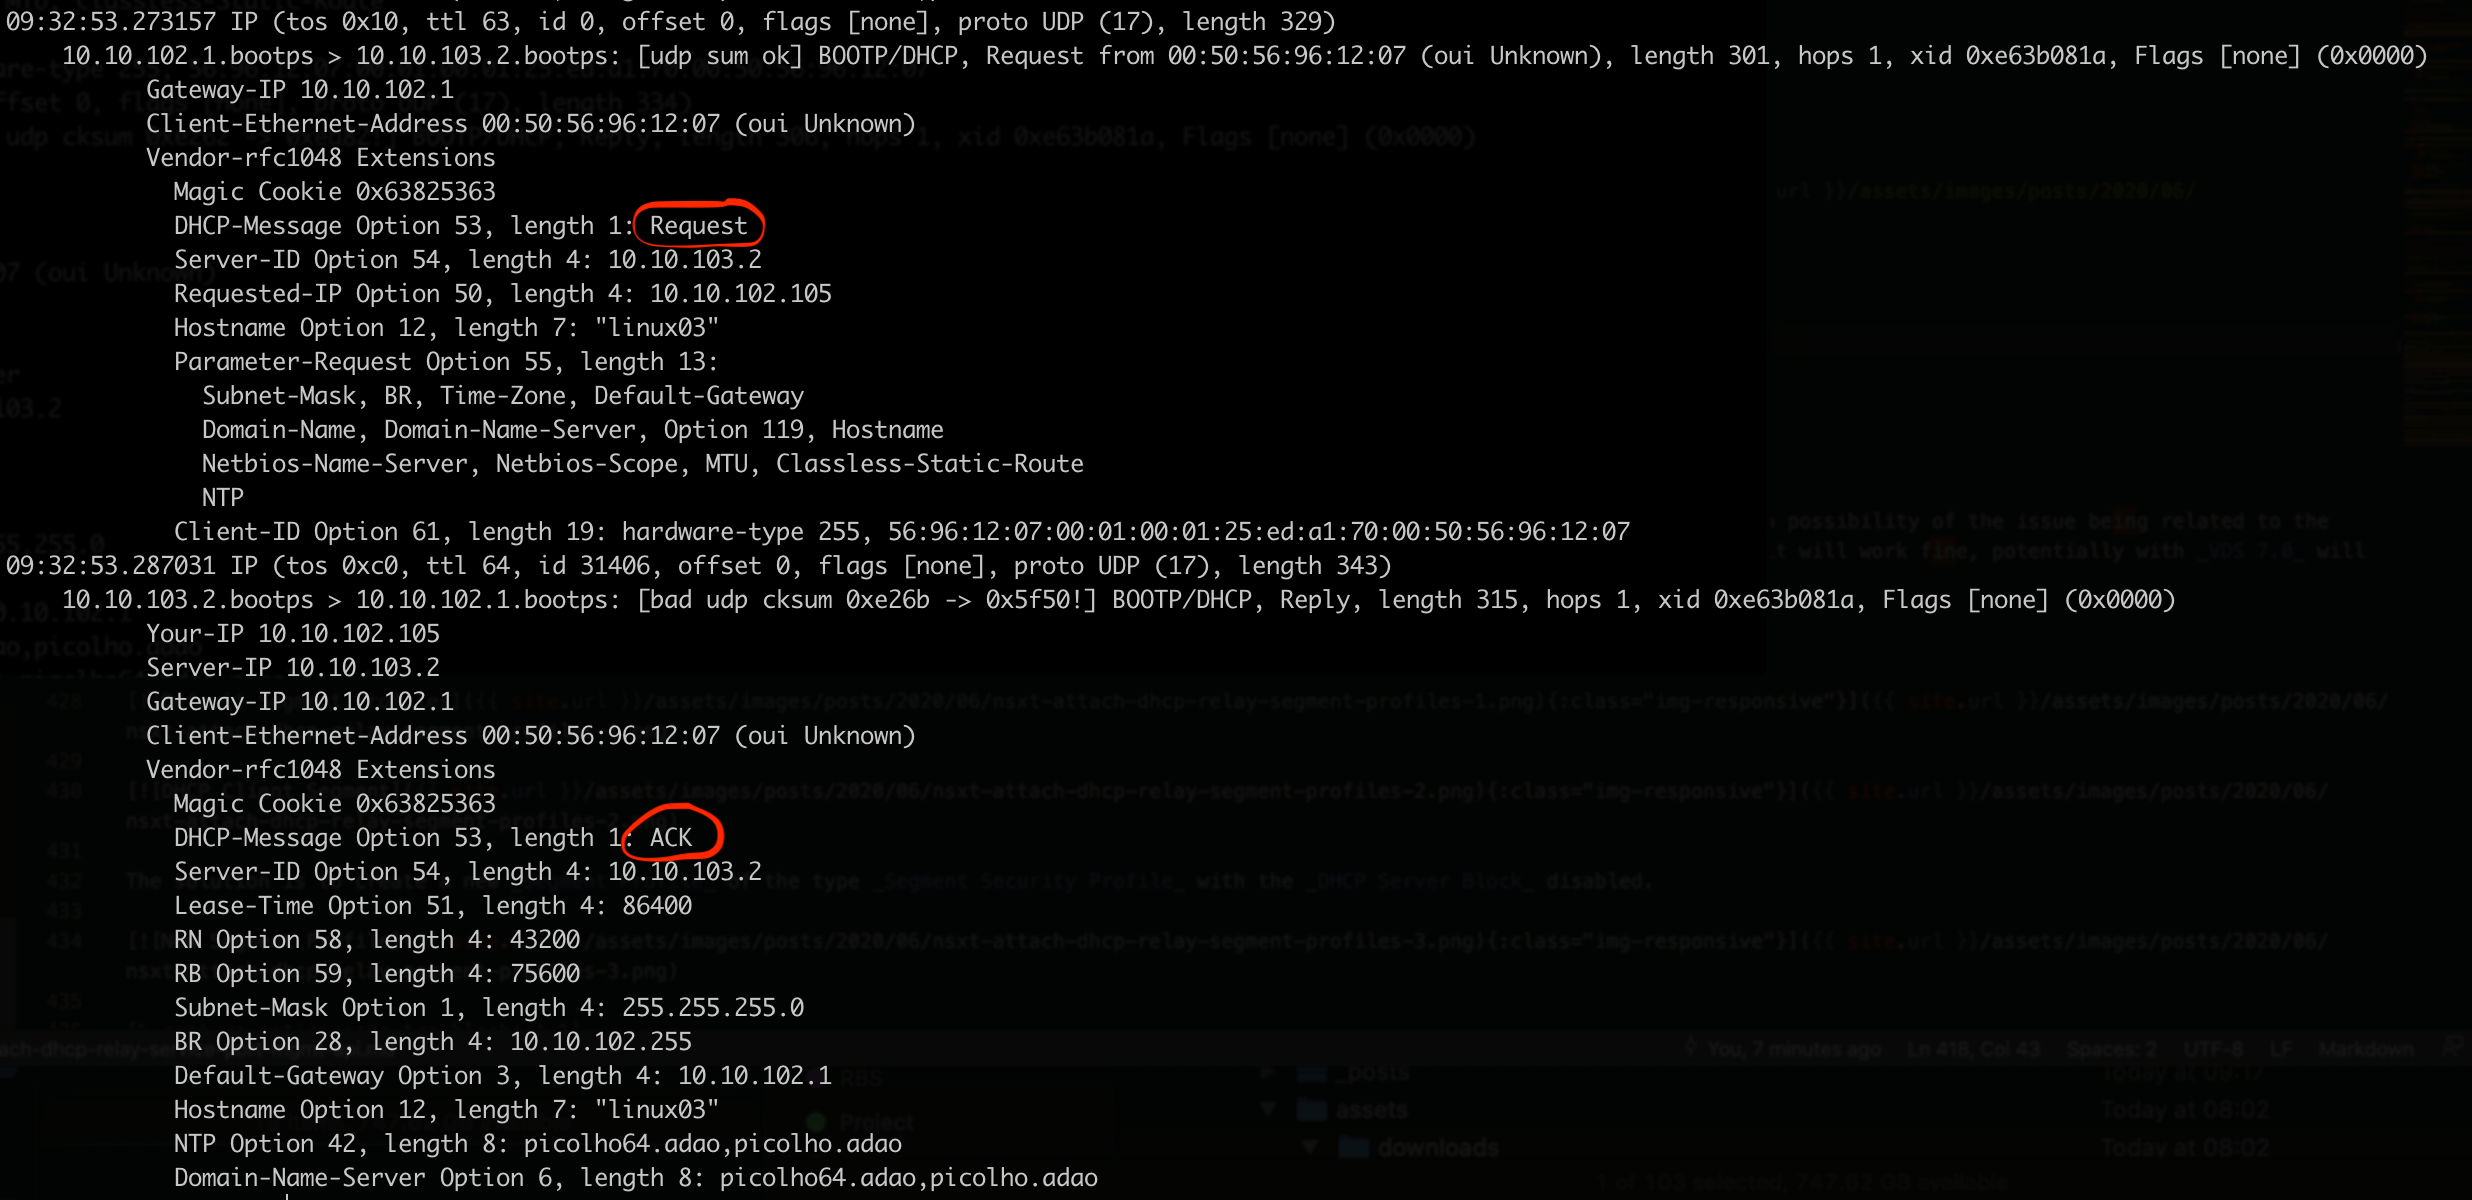
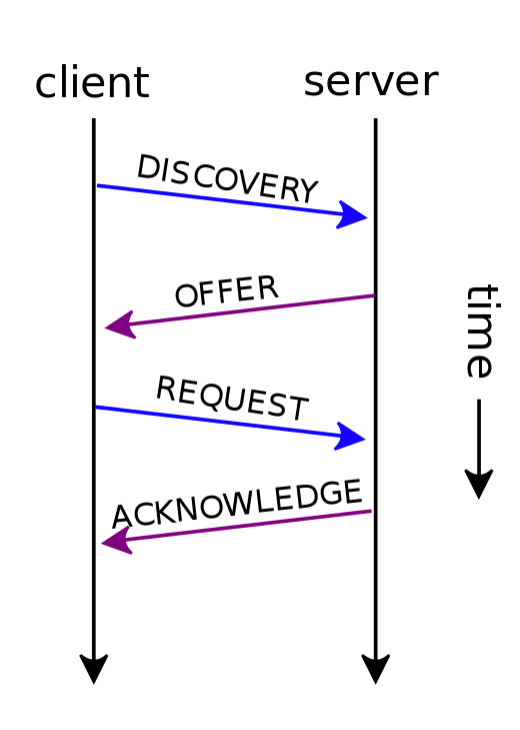
Yeap, we seem to see the all process - Discovery -> Offer -> Request -> ACK
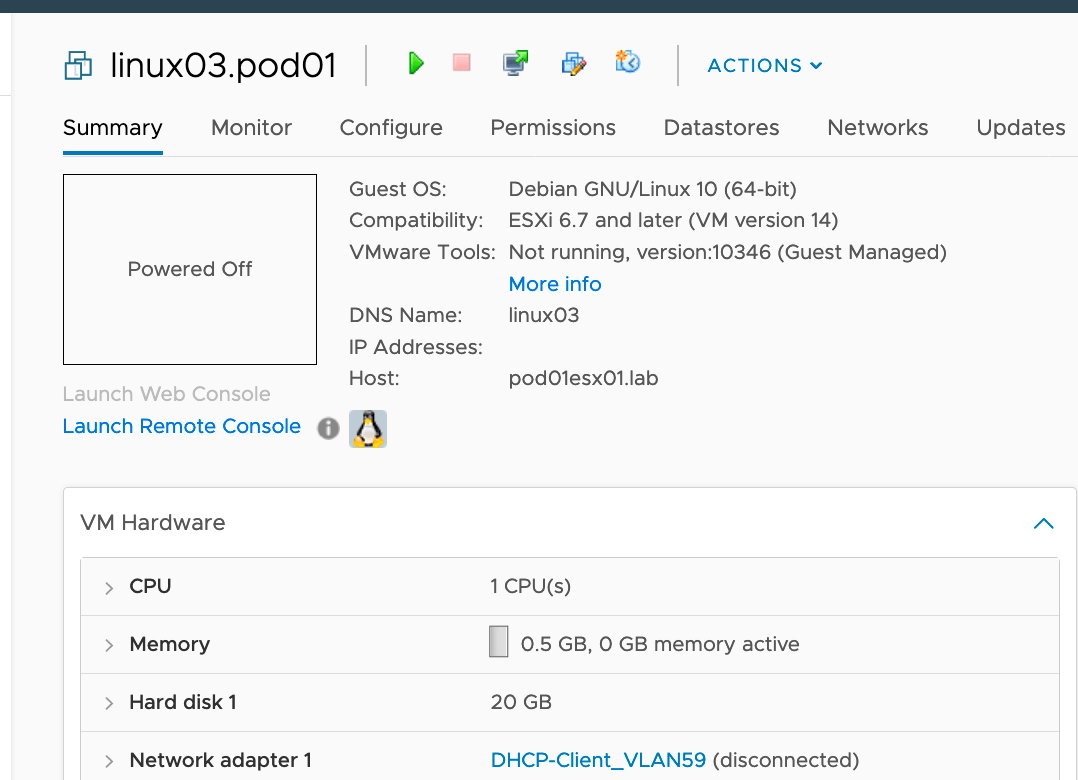
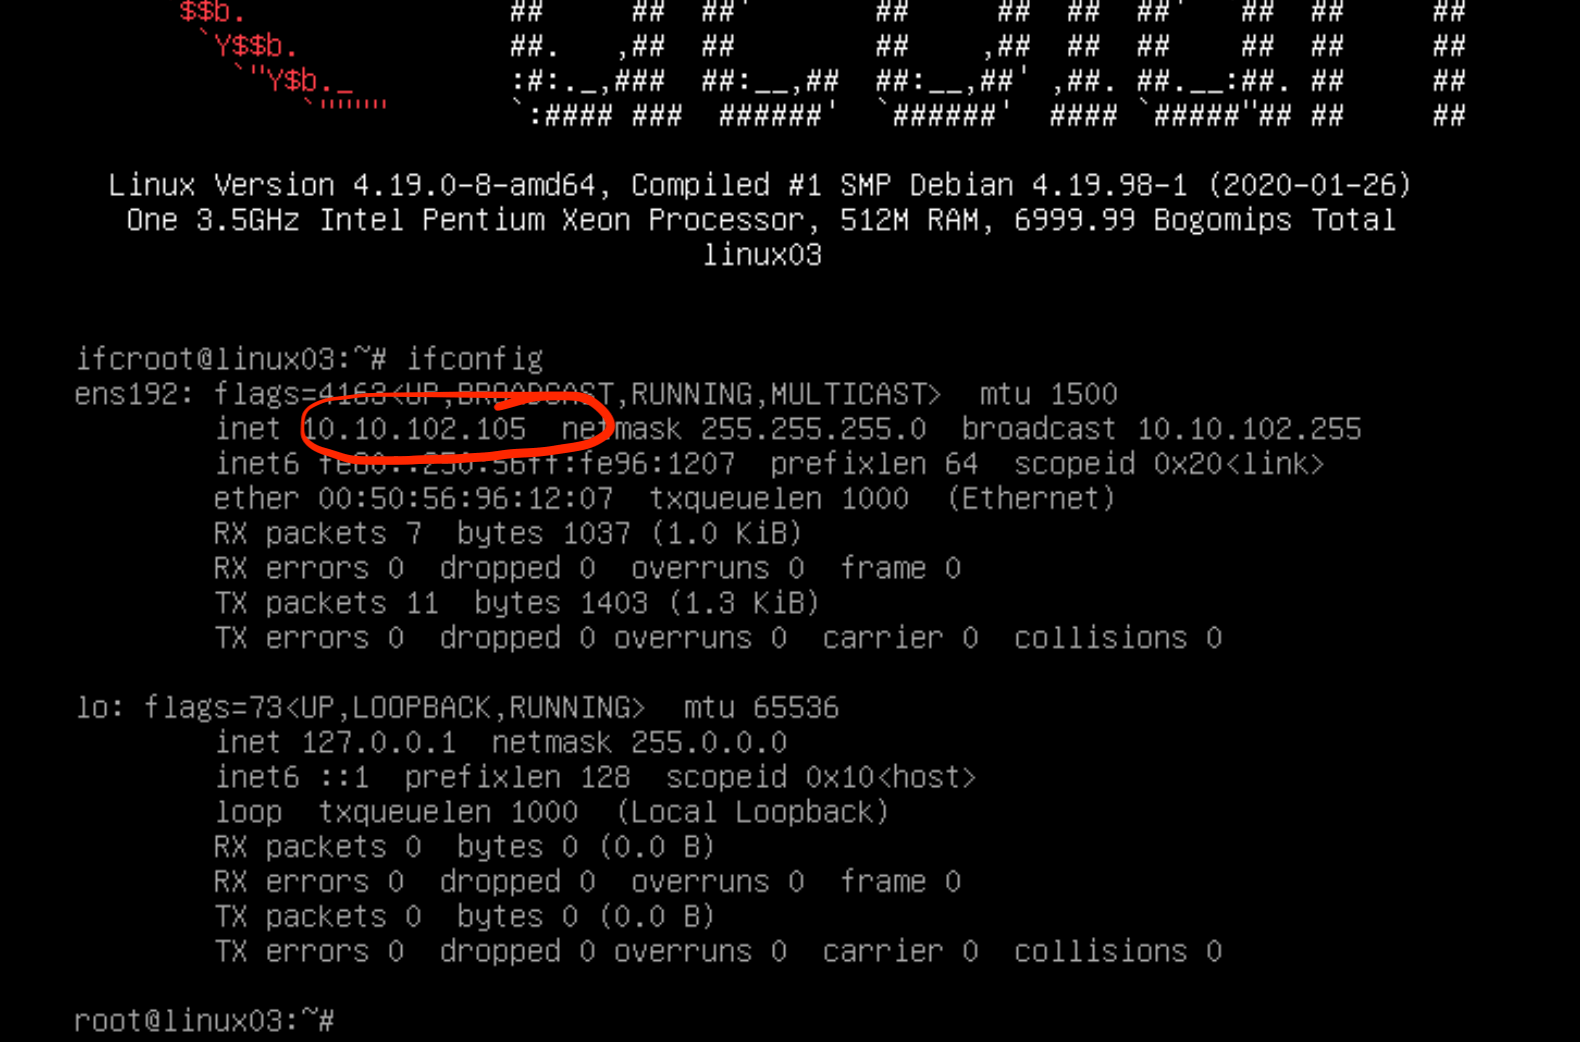
Check DHCP Client
In the DHCP Client side, lets just check if the virtual machine got the desired configuration after the DHCP exchange
FAQ
I followed the steps and my DHCP Client do not get an IP?
There are multiple factors that could be affecting this, however if the Use Case is similar to the one described in the post there is a possibility of the issue being related to the Segment Profiles applied to our Edge VMs trunks, in case we are using NVDS VLAN backed segments for it (if using DVS portgroups it will work fine, potentially with VDS 7.0 will be slightly different, but as explained before, Homelab is waiting for an upgrade).
By default, any segment created using NSX-T UI will get a set of default Segment Profiles.
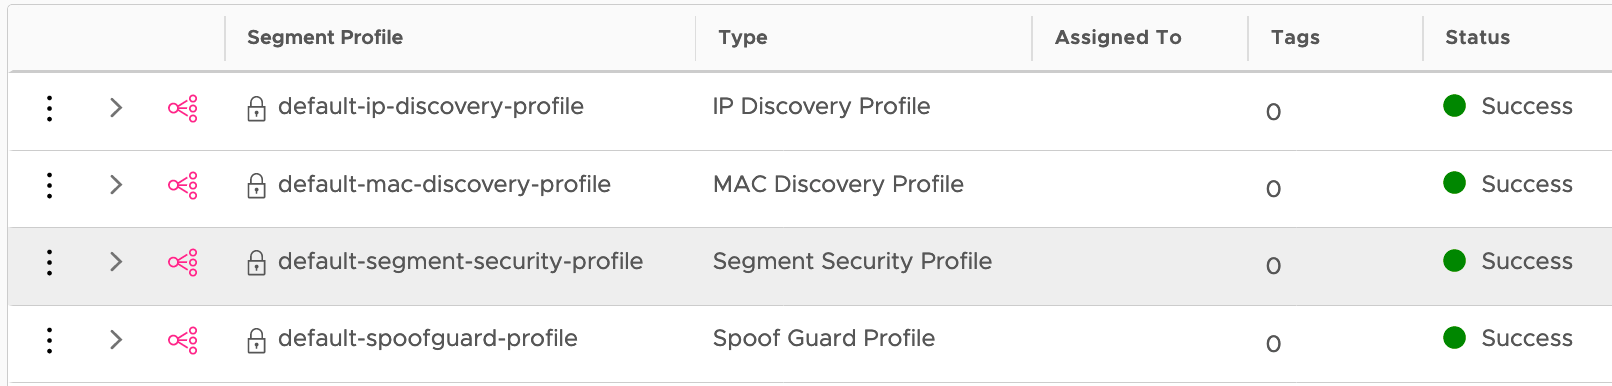
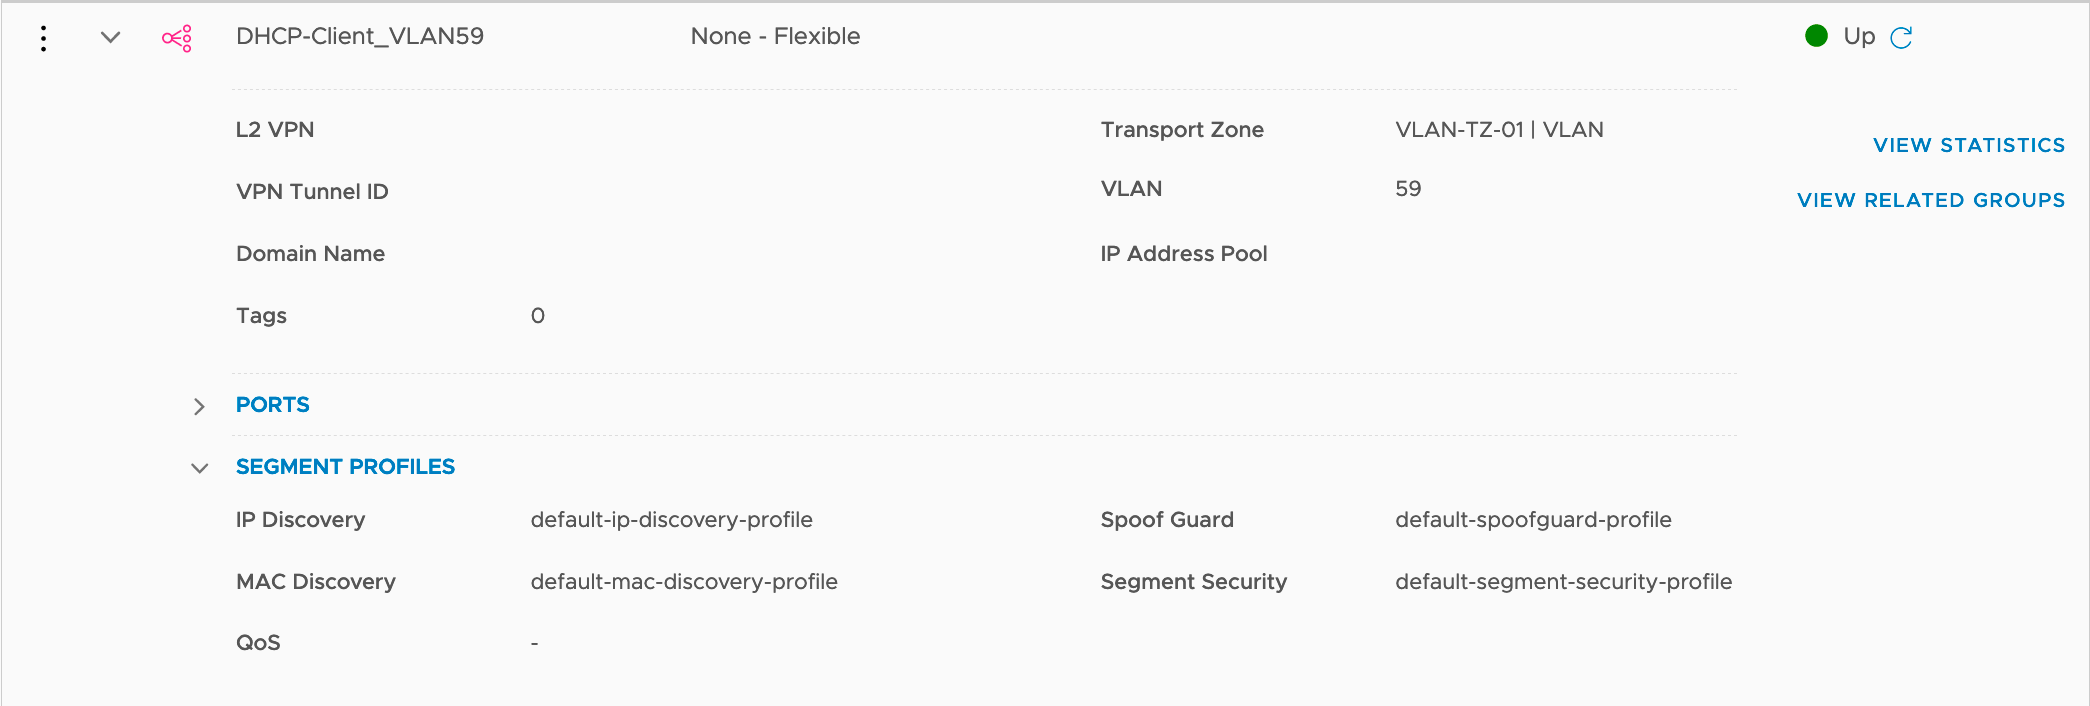
The solution is to create a new Segment Profile of the type Segment Security Profile with the DHCP Server Block disabled.
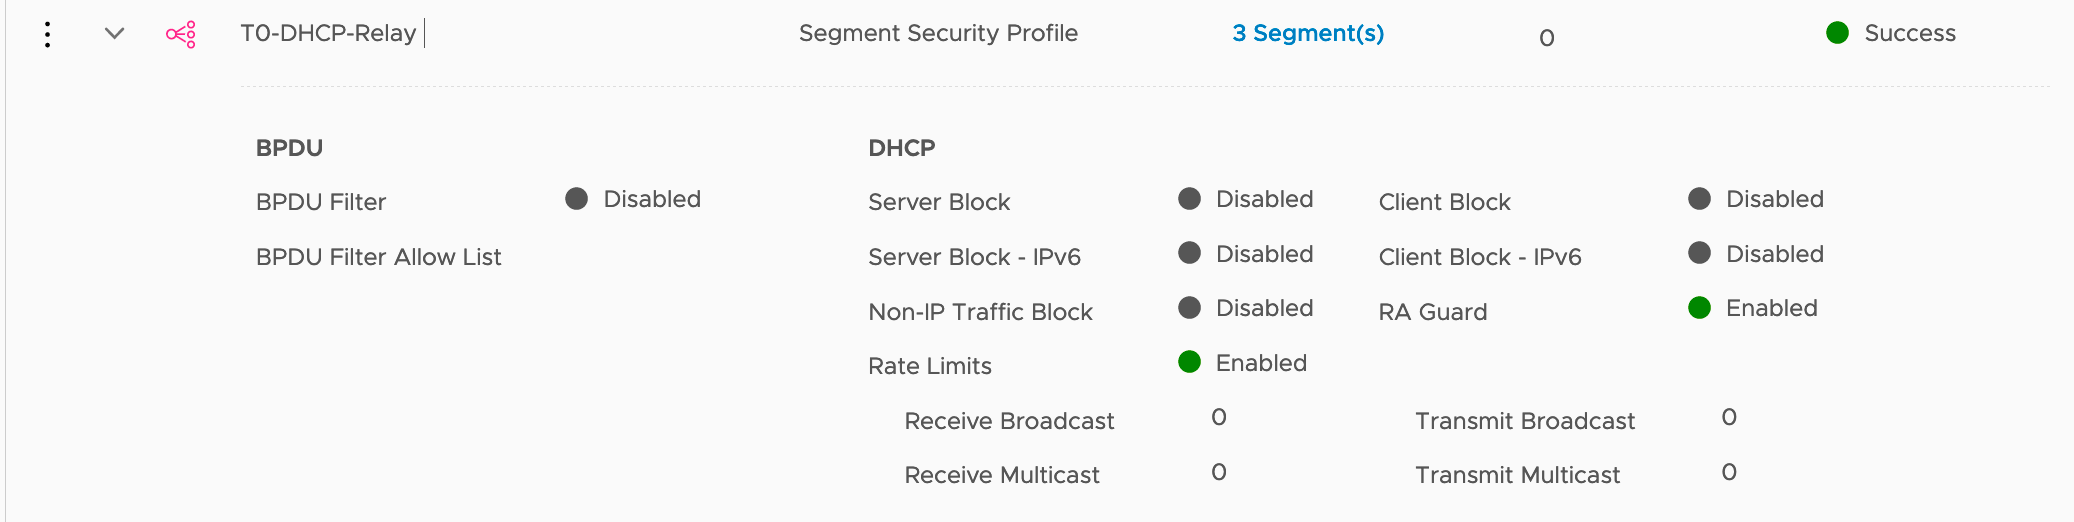
Note
I spent some time figuring it out and troubleshooting this issue.
In summary the DHCP Client never receives the DHCP Offer packet, since the packet is blocked by the default security policies between the Service Interface and the DHCP Client.
With the new Security Segment Profile with the DHCP Server Block disabled all works as expected.
Will it work for Logical Switches segments too?
In our Use Case, we have our DHCP Clients connected to a NVDS VLAN Backed segment, but this solution will also works if DHCP Clients are connected to a NVDS Logical Switch (overlay).
Can we script it?
Yes, it is a question of choosing your preferred programming language and you can script this partially or the entire process.
Since there is a part of the process that can be done easily using the NSX-T UI, I just script using Powershell (PShell 6 or above) the part where we need to leverage the Management API. It is not the prettiest powershell coding that you will ever see, but will do the job and show the process.